Raysterizer
Demo video
What is Raysterizer?
Raysterizer (Ray-ster-izer) is a framework that transforms existing real-time graphical applications using rasterization to use ray tracing instead. Think of this as a way to improve the graphics quality of existing programs with new methods for rendering.
- The project name is a play on words combining the terms ray tracing and rasterization.
Background
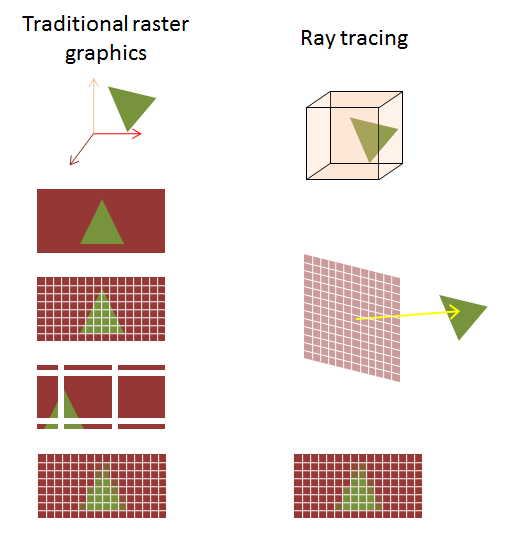
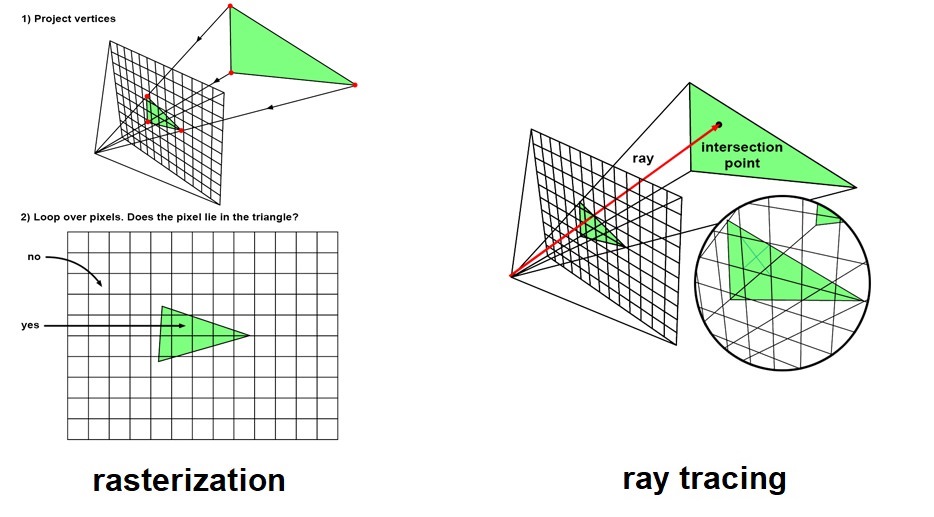
Over the last few years, a lot of has change in landscape of graphics, especially hardware. Many companies such as NVIDIA, AMD, and Intel have invested in creating hardware that performs ray tracing in real-time. In the past, rasterization was the choice for rendering as it could be done in real-time, but ray tracing was far slower, but in general, more graphically appealing.
- For readers with less knowledge about rasterization and ray tracing, this video by NVIDIA is a great way to get an overview.
- And also take a look at this blog post by Imagination.
Motivation
Although the hardware is there, software libraries and applications have been taking a very long time to support and use the hardware. Many games supporting the ray tracing are developed with ray tracing in mind from the ground up. Such examples are Quake II RTX, Control and Minecraft RTX.
But… what if we could leverage existing applications (in particular, games) and make them way more beautiful with ray tracing? If so, we could play games dating a decade ago or more in a new refreshing way (much like many remasters such as Dark Souls: Remastered, The Last of Us and Resident Evil 2)
Modders could use Raysterizer to easily enhance how a game looks (I’ll discuss the possibilites later in detail).
Graphics programmers can use the tool to run and test their ray tracing shaders on a variety of existing games to see how well the shader performs and looks.
Introducing Raysterizer
This is where Raysterizer comes into the scene. Raysterizer takes existing applications rendering using rasterization to use ray tracing instead. In particular, currently, it transforms existing graphics applications using OpenGL fixed rasterization pipe to use Vulkan ray tracing.
For example, Raysterizer can transform popular games/applications such as Runescape and Dolphin!
Examples

Features
Raysterizer currently a renderer that has these features:
- ray traced ambient occulusion
- ray traced shadows
- ray traced reflections
- global illumination
Raysterizer can target both open sourced and closed sourced applications. For example, dolphin is open sourced and old school runescape is closed sourced (technically, runelite is open sourced, but we kind of can ignore that…) or Roblox, which is definitely closed sourced.
Raysterizer can target application written in any language since raysterizer interacts with the application at the level of the graphics library. (For example, Old School Runescape is running java)
Raysterizer can run on any graphics card that supports Vulkan ray tracing. This includes Intel, AMD and NVIDIA cards.
You can take any application that uses opengl to render, put the raysterizer files in the same directory and run the application as usual and bam, the application should be using ray tracing instead!
For modders, Raysterizer provides a plethora of information and power to edit how the graphics is shown:
Problems
Raysterizer only works on graphics cards that support hardware ray tracing and only supports windows and OpenGL applications.
It doesn’t work with 32 bit applications (such as Amnesia: The Dark Descent)
Raysterizer is in a development stage…, expect crashes and many hacky fixes to get a particular application to perform well.
Some examples, I have faced
- Filtering out certain polygons that are transparent in the original application, but not in the raysterizered version
- Filtering out some OpenGL features to get Raysterizer to interact correctly
- Use explicit OpenGL version
- Search for fields for position, color or normals in source code that cannot be automatically detected (more on this later)
Definitely performance issues can occur on some applications (Do not recommend running raysterizer on something semi-modern with 1M+ polygons)
Oh god, I don’t really even want to talk about figuring out crashes…
- Can you attach a graphics debugger before the game crashes?
- Can you figure out which series of graphics call caused it to crash?
- Is the raysterizer code missing some implementation specific call to some archaic OpenGL graphics call?
- Did the polygons get transformed correct with the correct model view projection martix?
- Did the data get copied from CPU to GPU correctly?
- so on and so forth…
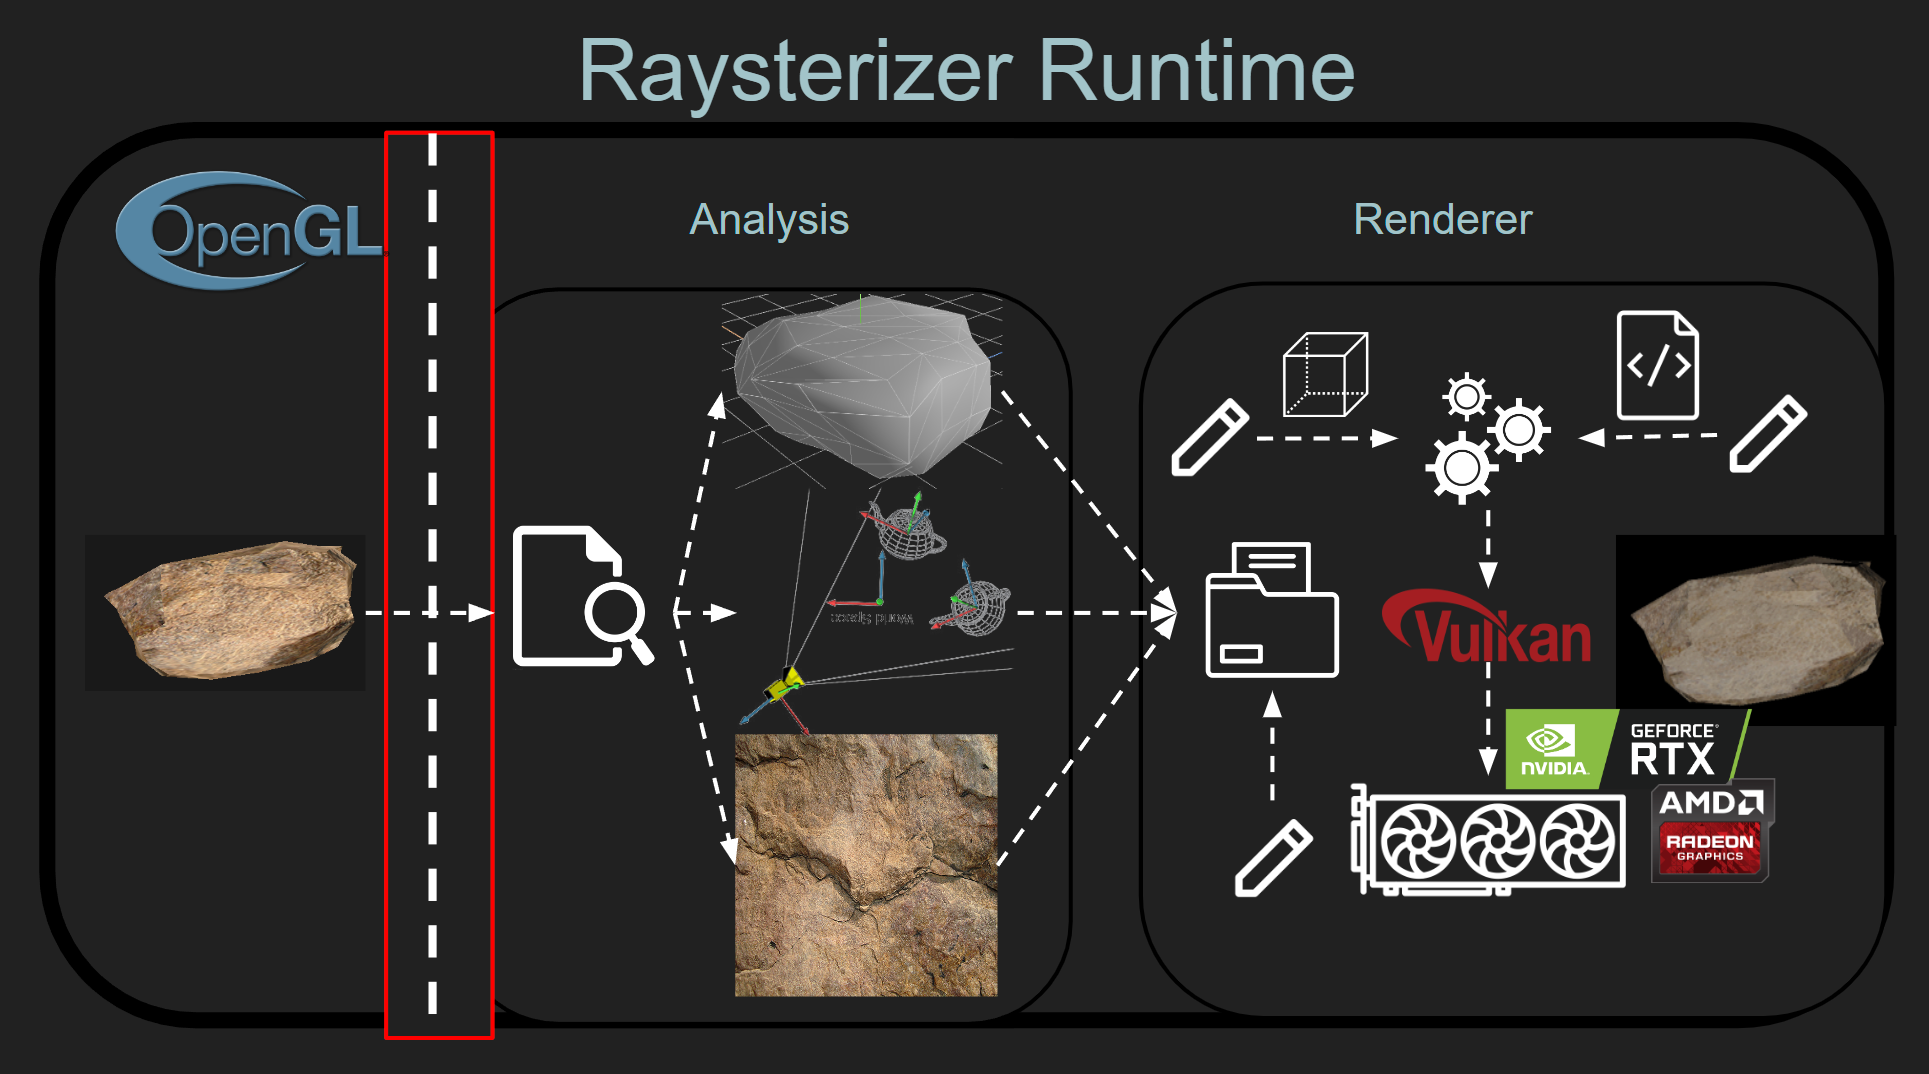
So…, how does it work?
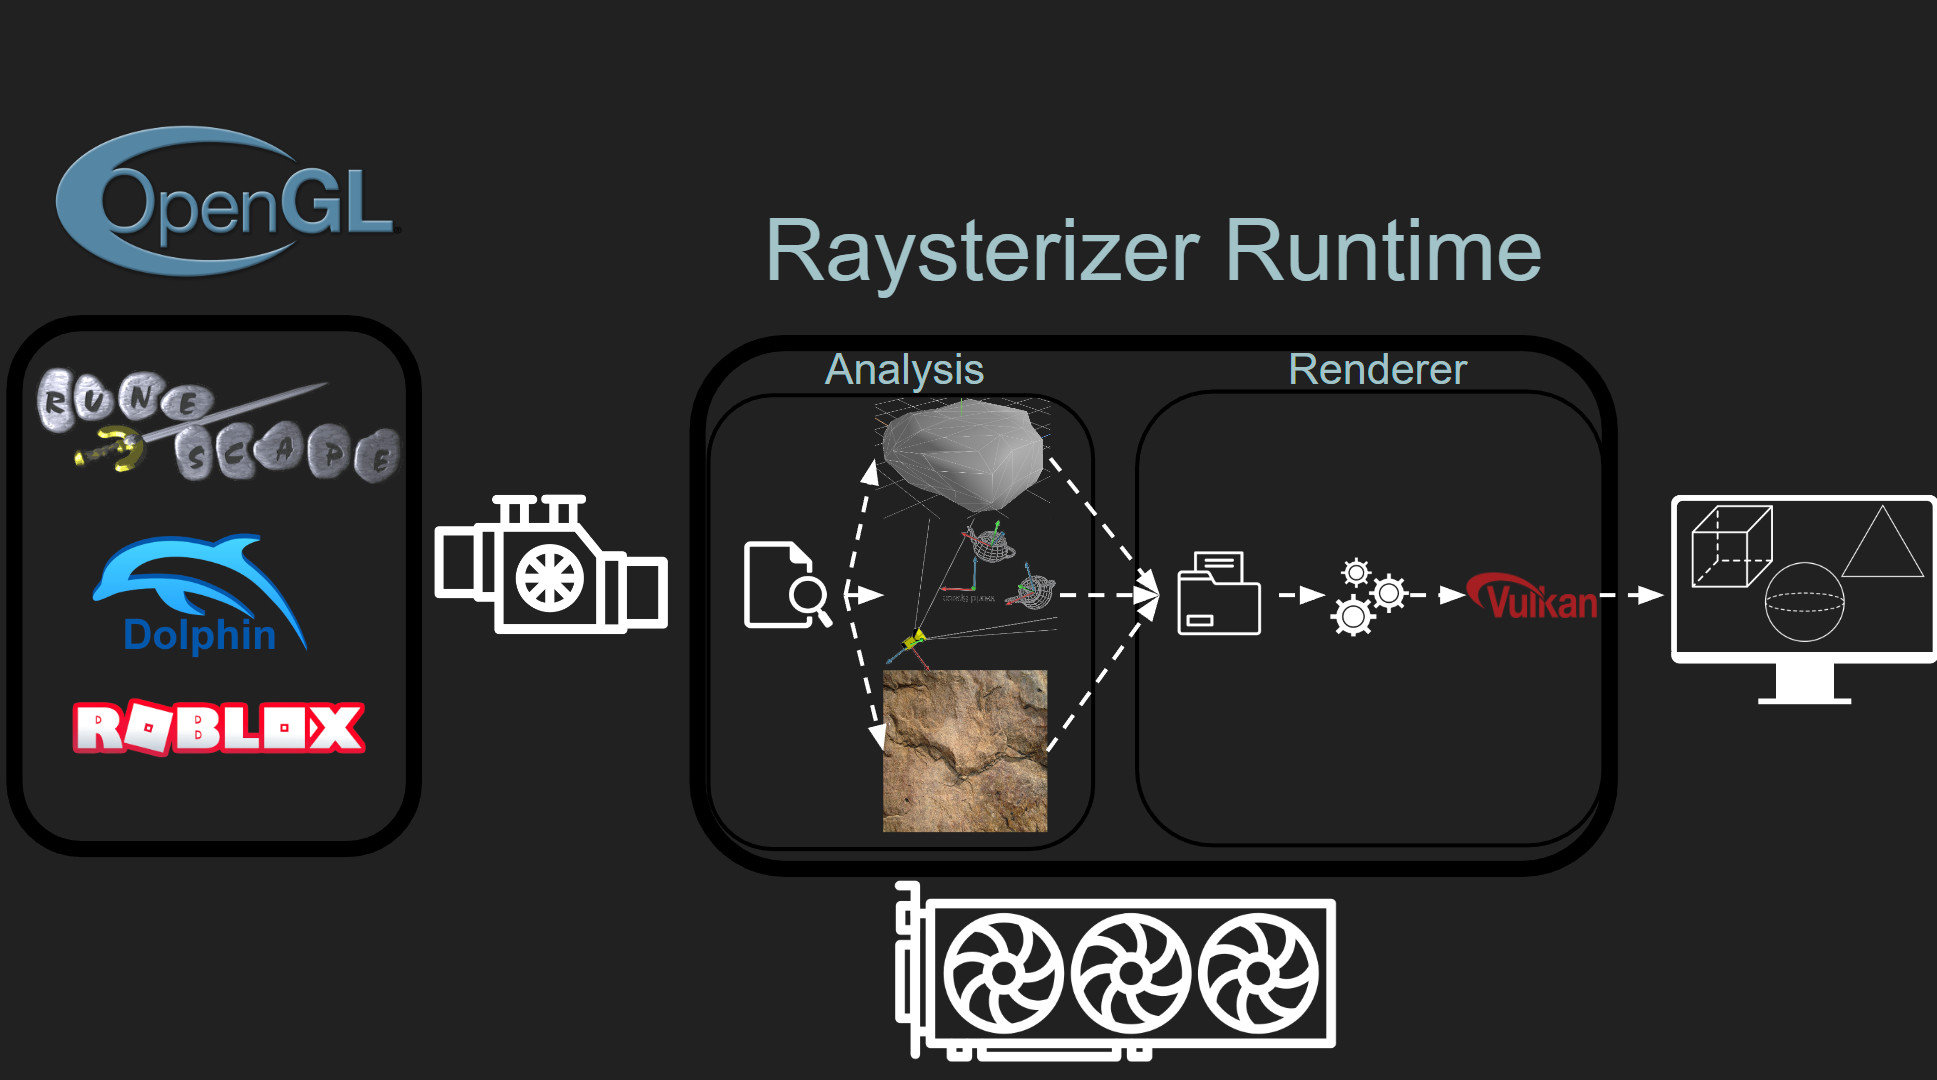
At a very high level, when an application runs on the raysterizer framework, it
- Takes any calls to graphics library (in this case OpenGL) to upload an object, draw an object, etc…
- Forward these these calls to analysis tool to break down the object into its textures, positions, etc…
- Uses the components to reconstruct the object on ray tracing hardware and use the ray tracing renderer instead
- Render to the screen a ray traced version of the scene
The devil is in the details
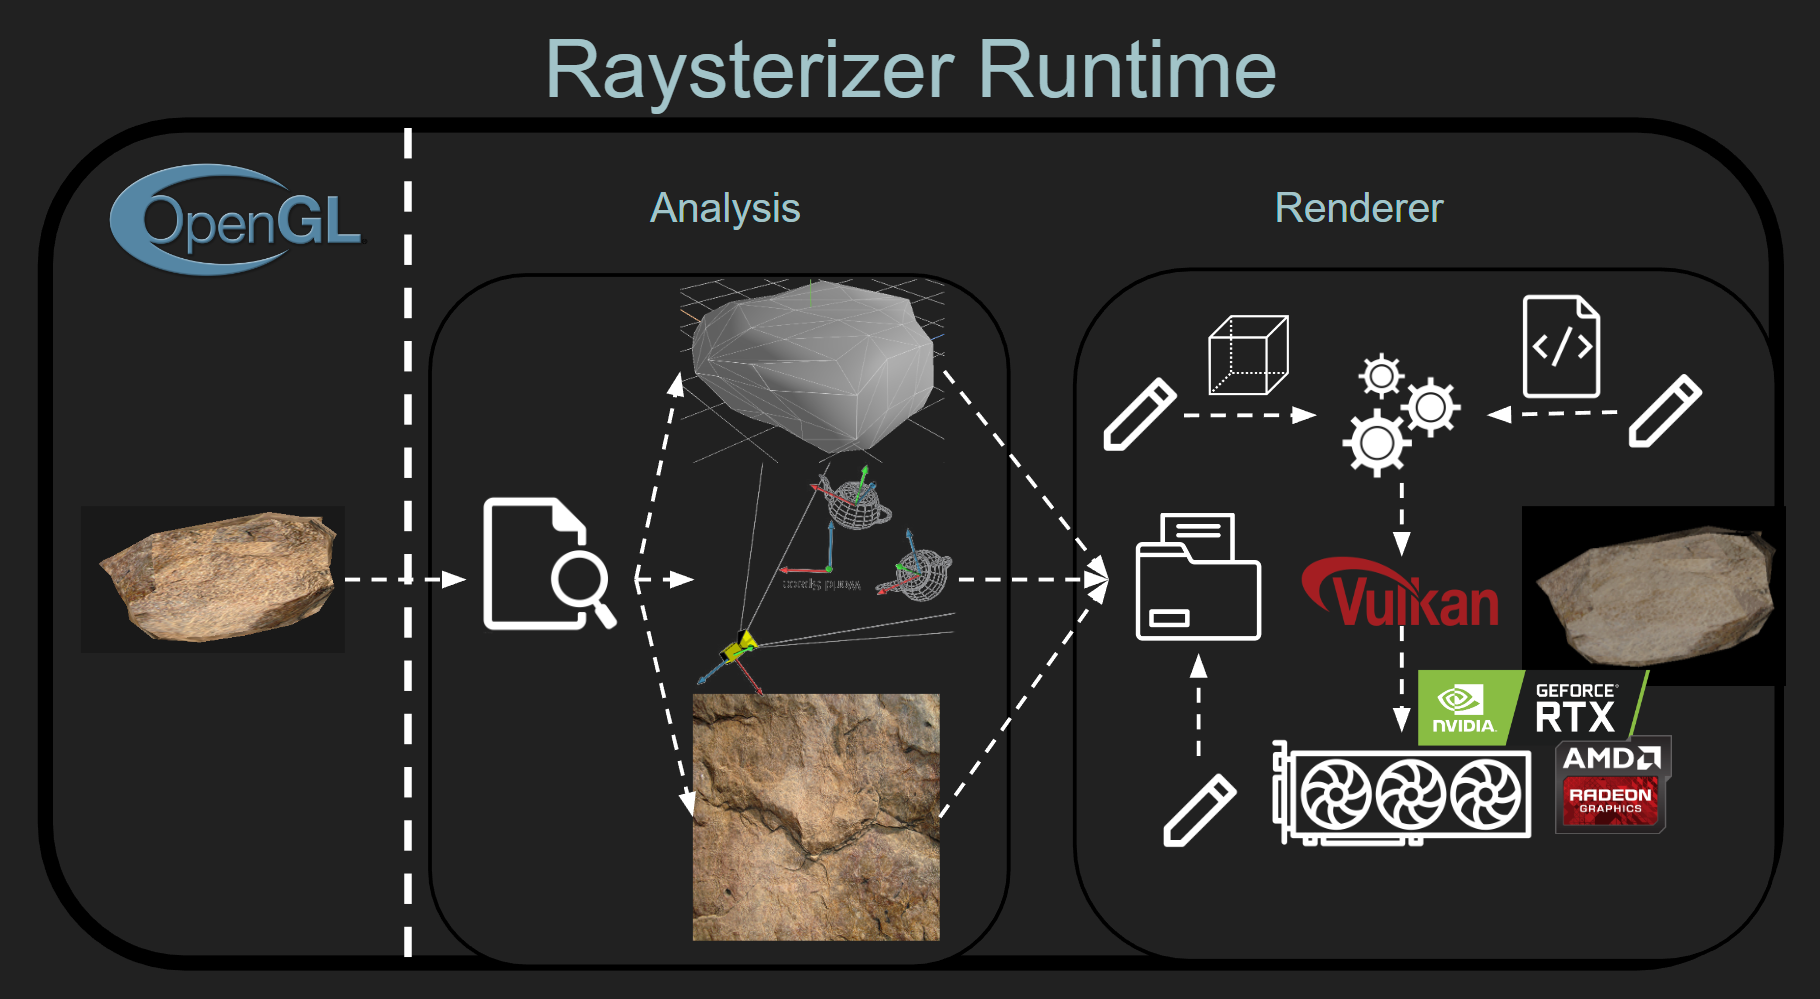
I’ll break down the overview image into sections below that will explain each component of the system:
Redirecting OpenGL
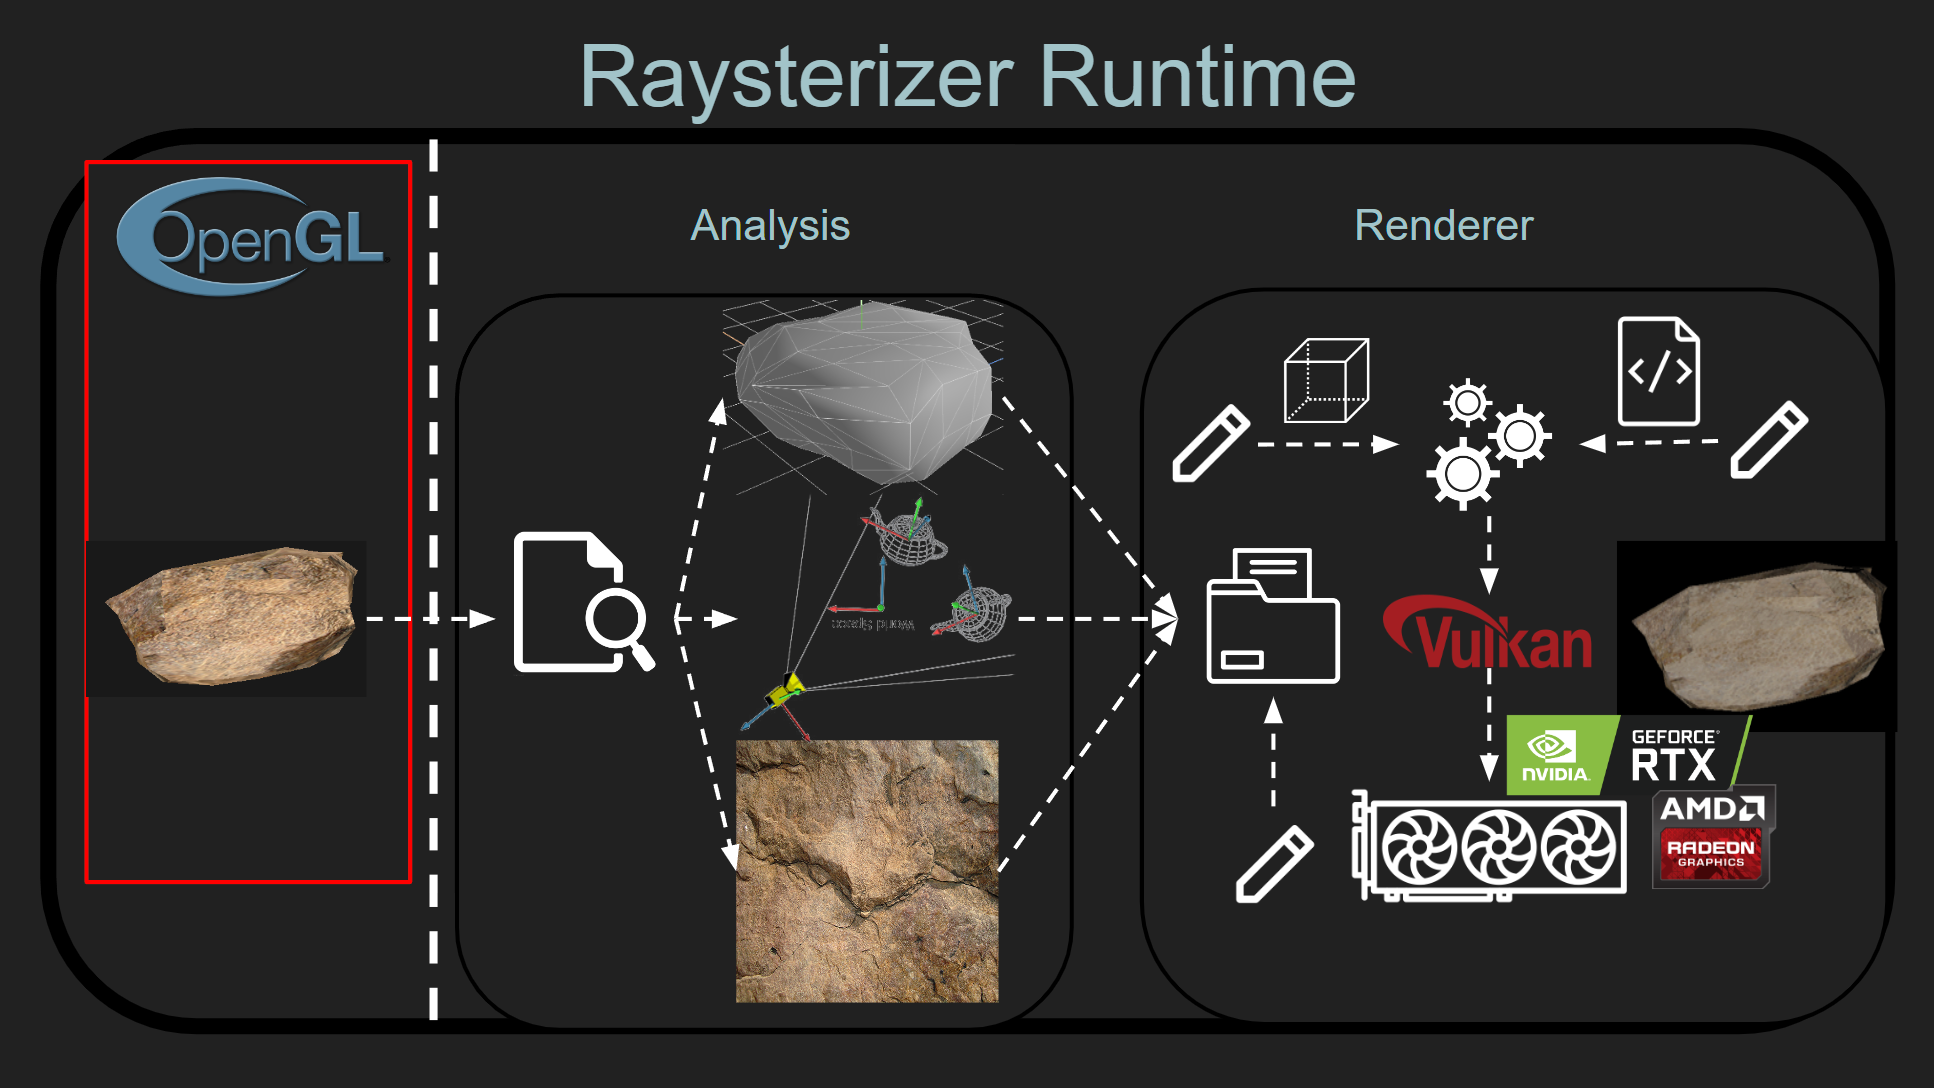
- Note: Keep in mind that Raysterizer targets 64-bit processes and Windows
There are many ways to redirect control flow from a library. One common way is to hook the library at runtime by code injection, but this complicates things as it requires first running the application and then running another piece of software that modifies the application. In addition, this may cause more timing or race conditions if the application isn’t properly paused at the beginning.
So instead, I opted for dll hjacking. In order for an application to use the OpenGL library, the application has to find and load opengl32.dll (the OpenGL dynamic library) which implements the underlying functionality of the OpenGL API. Windows loads libraries in a certain way by first searching the current directory and then the system directory. By naming a library I created opengl32.dll and putting it in same directory as the application, the application will search and load my version of opengl32.dll instead of the system version.
With this approach, one needs to implement the functions exported by opengl32.dll in order for the application to work properly. I did do this, but for most of the functions I was not interested in, I immediately redirected calls to the proper calls of system opengl32.dll. However, for the functions I was interested in, I wrote code to gather or modify data fed into the OpenGL library before directing the call back to system opengl32.dll.
Translating OpenGL and Maintaining State
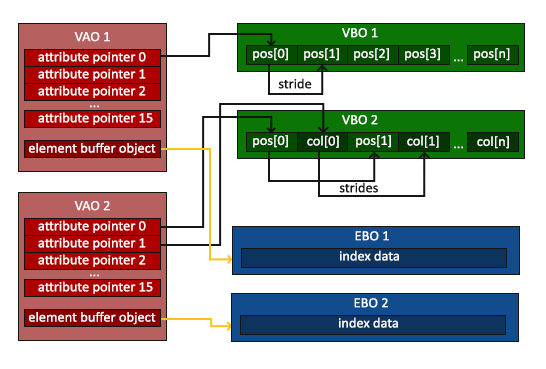
At this point, OpenGL calls can be intercepted. This is one of the more important and tricky parts. Raysterizer actually has to keep OpenGL state internally (while OpenGL itself state machine, its internals are not exposed). Raysterizer keeps track of Vertex Array Buffers, Vertex Buffer Objects, Frame Buffer Objects, etc…, which is difficult enough with the millions of different ways these objects can be edited.
But what makes it more tricky is that Raysterizer has to keep track of every state before the image is rendered.
See, unlike rasterization, ray tracing requires all state to be visible (every object, texture, etc are in memory) in order to work (Think about it, a ray needs all of the objects in the scene to be known before it is cast). Rasterization is all about rendering one or a bunch of objects and tossing those objects out because rasterization works at a single layer level (draw object, write rgb to screen, write to depth buffer and move on to the next object).
So, what does how does this influence to how raysterizer is implemented? Every time a draw call is made, Raysterizer needs to keep a snapshot of all the resources used in that draw call. Depending on the complexity of the application, say, an object is 100 million triangles. So, if the object gets drawn twice, Raysterizer has to copy the object in two snapshats (200 million triangles in total) and then use those triangles for ray tracing. This will cause a huge performance hit as most of a frame, raysterizer will be copying data to create a snapshot (this was a problem in very early versions of Raysterizer).
An optimization is to create diffs and check hashes between resources to see if anything has changed between snapshots. So instead of copying a resource, Raysterizer will create a reference to the previous snapshot’s resource if the resource has not been modified since the previous snapshot. However, this adds even more complexity as now Raysterizer needs to keep track of modifications and hashes per resource. But, this is worth the performance gains!
Once the state is all tracked, we need to perform some analysis on the resources.
Analysis
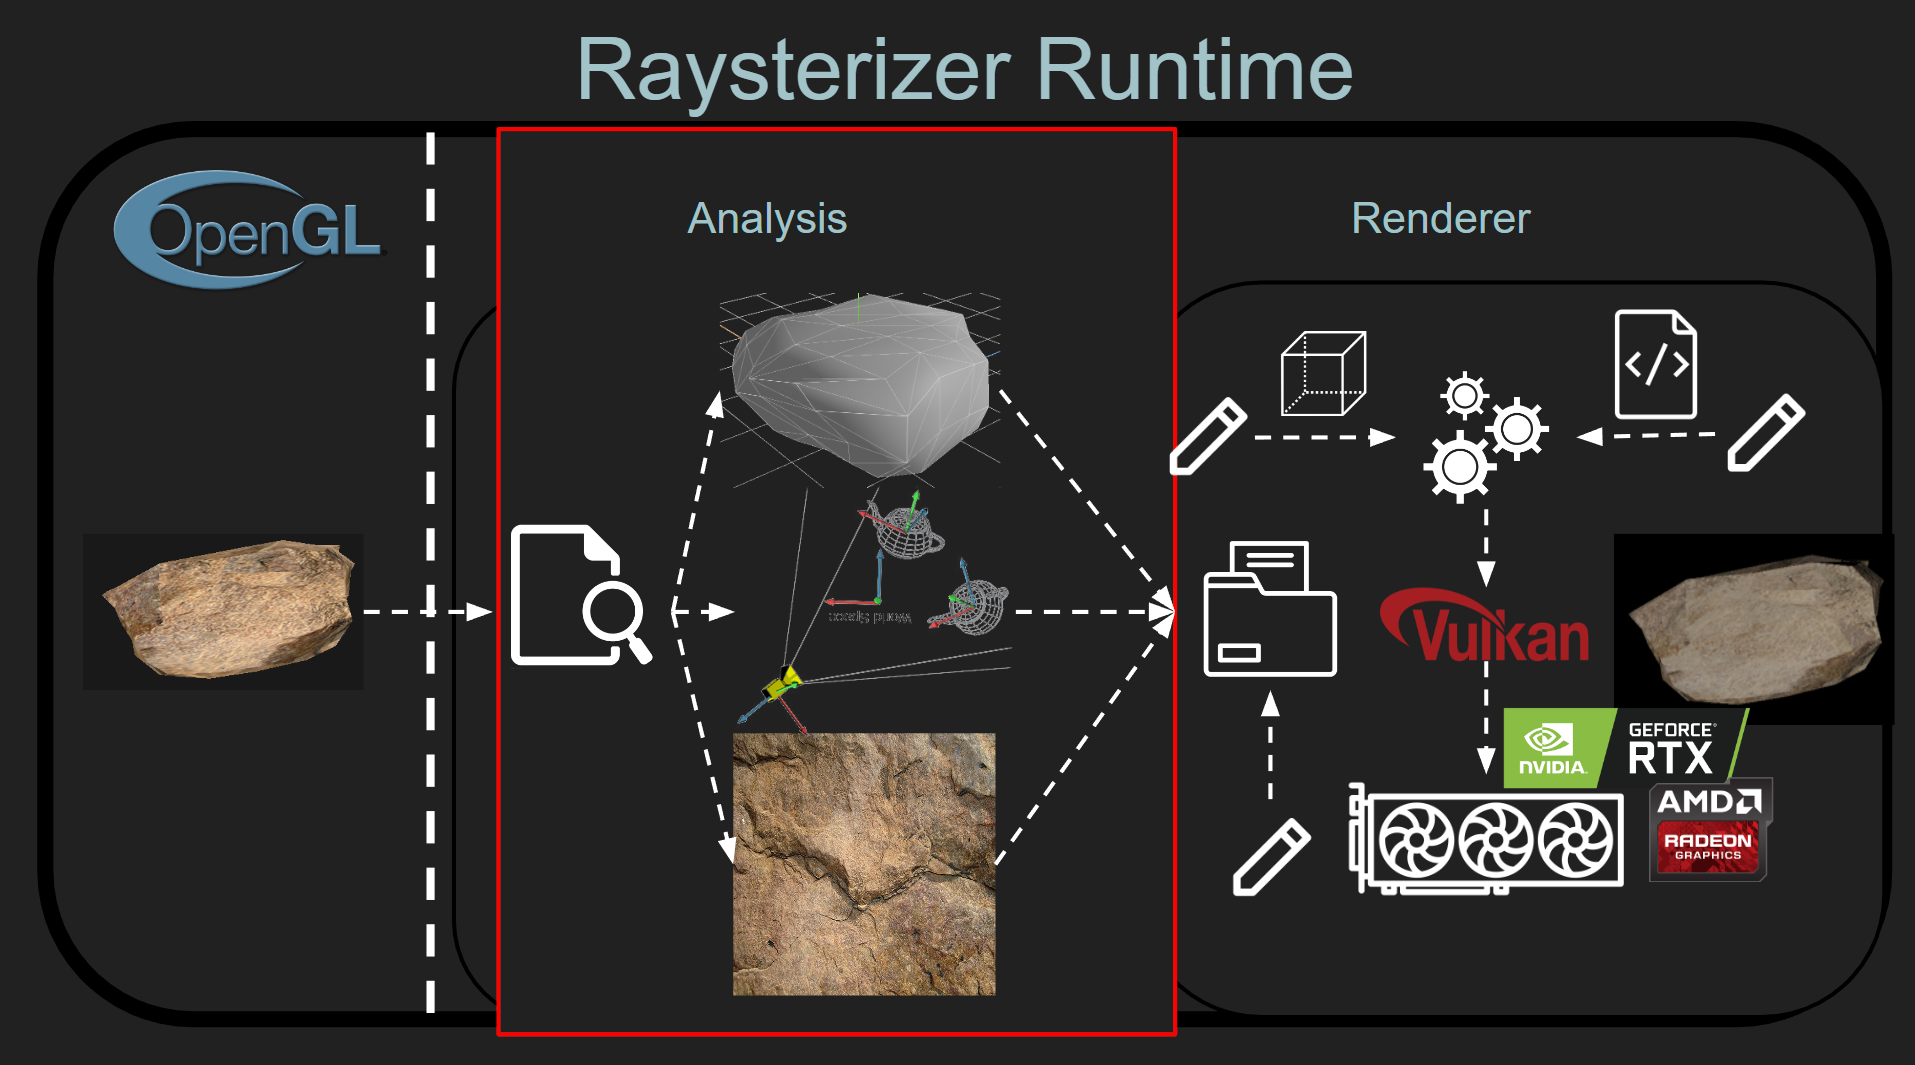
The analysis component of Raysterizer is the magic sauce that allows ray tracing to be possible. This can be broken down into a couple of components.
Breaking down textures and vertices
Each texture and vertices in OpenGL need to be uploaded into separate buffers that are supported by Vulkan ray tracing. Textures are simple - map the corresponding OpenGL texture properties to equalivent Vulkan texture properties. Vertex buffers are simple on paper (just upload the same buffer to Vulkan!), but there’s some interesting parts to Vulkan ray tracing and ray tracing in general that need to be addressed.
To implement some features such as shadows and reflections in ray tracing, there needs to be variables that need to be exposed (normals, albedo color, metallicness, roughness). This can be done very coarsely by performing some regex to grab the names in the buffer and exposing those values in the shader.
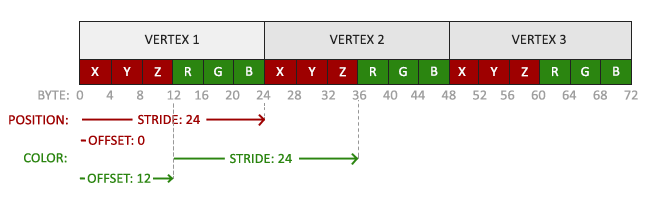
In terms of the ray tracing API, it needs to know how big each vertex is and where and how the position is structured in the vertex. In 99% of cases, the position is embedded as the first element of the vertex. How the position is structured could range from 2 ints to 4 floats. Simple enough.
However, what is most difficult is that ray tracing needs to know the transformation matrix ahead of time…
Figuring out model view projection
The most crucial part that makes raysterizer work is figuring out the model view projection matrices.
Why do we even need to figure this out? Normally, aren’t these matrices just computed in the shader code? For example,
#version 330 core
layout (location = 0) in vec3 pos;

uniform mat4 model;
uniform mat4 view;
uniform mat4 projection;

void main()
{
    gl_Position = projection * view * model * vec4(pos, 1.0f);
}
Well, much like what was described for resource tracking, since this is computed per draw call, the ray tracing requires all state to be known before ray tracing is done. So, we need to know these matrices ahead of time as well :)..
In particular, in Vulkan Ray Tracing, there’s a concept of top level acceleration structures (TLAS) and bottom level acceleration structures (BLAS). These are opaque structures created in Vulkan that represent objects in the ray tracing scene. Think of BLAS as an abstract container that holds the vertex data and TLAS as an instantiation of one or more BLAS as an actual object.

TLAS contain a very important field, which is how the object is transformed in the scene. Take a look at transform field in VkAccelerationStructureInstanceKHR. This usually represents the model matrix, which describes how a mesh is translated, rotated and scaled.
// https://registry.khronos.org/vulkan/specs/1.3-extensions/man/html/VkAccelerationStructureInstanceKHR.html
typedef struct VkAccelerationStructureInstanceKHR {
    VkTransformMatrixKHR          transform;
    uint32_t                      instanceCustomIndex:24;
    uint32_t                      mask:8;
    uint32_t                      instanceShaderBindingTableRecordOffset:24;
    VkGeometryInstanceFlagsKHR    flags:8;
    uint64_t                      accelerationStructureReference;
} VkAccelerationStructureInstanceKHR;
// https://registry.khronos.org/vulkan/specs/1.3-extensions/man/html/VkTransformMatrixKHR.html
typedef struct VkTransformMatrixKHR {
    float    matrix[3][4];
} VkTransformMatrixKHR;
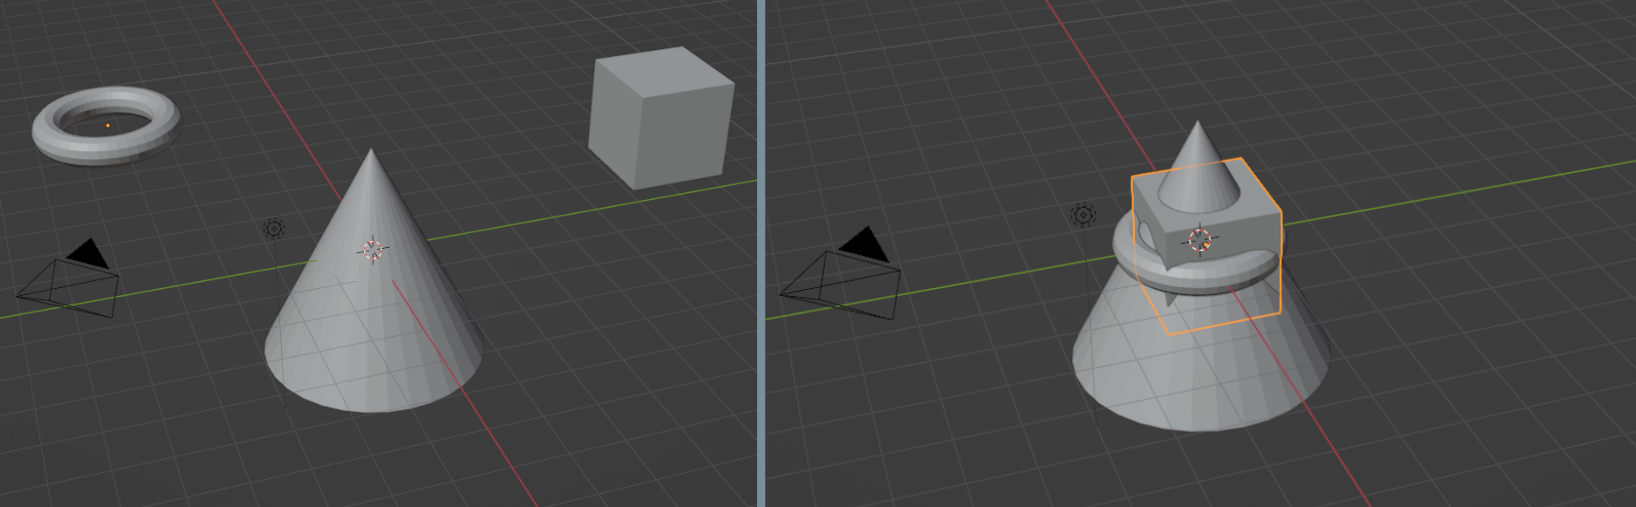
One might ask, why don’t you just make this matrix the identity matrix and handle all matrix multiplication like you do in rasterization. Well, one, the ray tracing shaders does not expose a way to modify vertex attributes like the rasterization ones. Second, even if the shaders exposed a way to modify vertex attributes, there’s a huge performance pentality since the hardware optimizes the ray tracing scene to trace rays optimially. If every mesh was not transformed, they would all be pretty much overlap each other in the scene, which is not great for ray tracing (Think about whether the ray would reach certain parts of the cone in the image below)
So, what have been attempted to extract the model view projection matrices?
One brute force way I did this originally was to regex to names to grab these projections. However, these matrices come in many different names such as modelViewProjection, MVP, modViewProj, mViewprj, and many others. In fact, many times, the correct variable is intermediate variable coming from the computation some variables. Take, for example, how dolphin does this:
#version 330 core
layout (location = 0) in vec3 pos;

UBO_BINDING(std140, 2) uniform VSBlock {
    ...
	float4 cproj[4];
    ...
	float4 ctrmtx[64];
};

ATTRIBUTE_LOCATION(0) in float4 rawpos;
ATTRIBUTE_LOCATION(1) in uint4 posmtx;

void main()
{
    ...
    int posidx = int(posmtx.r);
    float4 pos = float4(dot(ctrmtx[posidx], rawpos), dot(ctrmtx[posidx+1], rawpos), dot(ctrmtx[posidx+2], rawpos), 1);
    ...
    o.pos = float4(dot(cproj[0], pos), dot(cproj[1], pos), dot(cproj[2], pos), dot(cproj[3], pos))
}
In the example above, the model matrix is actually constructed from mat4(ctrmtx[posidx], ctrmtx[posidx + 1], ctrmtx[posidx + 2], float4(0, 0, 0, 1)) and the view projection matrix is composed from mat4(cproj[0], cproj[1], cproj[2], cproj[3]).
The first real attempt at doing this I used a theorem prover, z3 solver, to attempt to create a system of equations from the glsl code. It worked, but was incredibly slow…
So, I was bummed out for a bit since it needed to be both correct and FAST. I could try to modify the original shader, find the important code that create the matrices, but I felt that was again too hacky (much like regexing).
After some time thinking and working emulation (some projects modifying binaries at this time with dynamic analysis), an idea popped up in my head about running the shader in a virtual machine with certain inputs and running those inputs until I hit some certain state and then inspecting the intermediate values! And the perfect project fit that box - SPIRV-VM. This is a project which executes spirv (what glsl can be compiled to) in a virtual machine.
So, the the next step is how to find the intermediate values that are important (representing the model view projection matrices). Thus, this is where static analysis comes in to play. Let’s disassemble the spirv with spirv-tools and perform some data analysis. I built a dependency graph from variables that influence (modify) the output position, which is in most cases gl_Position. Then, when the virtual machine is chugging along each instruction, I can check if this variable influences gl_Position and mark down its value. When the virtual machine finishes executing, I construct a mapping to multiply the intermediate values to get the correct model, view and projection matrices. For example, let’s say we have the dolphin example above. We want mat4(ctrmtx[posidx], ctrmtx[posidx + 1], ctrmtx[posidx + 2], float4(0, 0, 0, 1)). We cannot just grab the intermediate values directly since we do not want to multiply by rawpos such as the result from float4(dot(ctrmtx[posidx], rawpos) since we want the matrices that multiply rawpos. So, the mapping would look like this
...
matrix1 = [ctrmtx[posidx], ctrmtx[posidx+1], ctrmtx[posidx+2], 1]
matrix2 = [cproj[0], cproj[1], cproj[2], cproj[3]]
The last question is what values do I plug into the virtual machine? I find a vertex in the vertex buffer with non-zero position and sync any variables in the OpenGL state with the variables in the virtual machine such as uniforms and storage buffers. A single vertex should be fine because the model view position matrix is usually applied to each vertex in a mesh.
Finally, we have a way to extract these important matrices! And, it runs fast too.
- There probably is a better way to perform analysis. Unforunately, I’ve never taken a compiler course, so I might be missing some knowledge to do this better.
Vulkan Ray Tracing
Shader Transformation
OpenGL shaders are written in GLSL. Vulkan shaders are written in GLSL. Most things are similar, but there are some differences. Simple things such as some syntax has changed. With the introduction of the ray tracing shader, it requires a different way of writing shaders. And…, thus we need a glsl parser (tokenization) to rewrite the source code.
Originally, I had a mapping from OpenGL rasterization code directly to ray tracing shaders (ray generation, hit, miss). This became pretty unsustainable as I edit most of the existing code with arrays instead of buffers. Remember that ray tracing requires to know all state when rendering is performed while rasterization is a draw and forget? Well, basically my transformations looked like this:
uniform vec3 color;

-->

layout(binding = 0) vec3 color_
{
    int color[];
};
Not only that, but the logic had to be edited as well.
vec3 outColor = mix(red, color);

-->

vec3 color = color_[draw_call_index]
vec3 outColor = mix(red, color);
This makes it even more complicated with textures as in the code, they cannot be stored as a temporary variable, making the transformation more inlined…
uniform sampler2D myTexture;

vec3 color = texture(myTexture, coords);
So, this is illegal
uniform sampler2D myTexture[];
...
sampler2D myTexture = myTexture_[draw_call_index];
vec3 color = texture(myTexture, coords);
And what should be done is this:
uniform sampler2D myTexture[];
...
vec3 color = texture(myTexture_[draw_call_index], coords);
I haven’t even discussed the state management from the CPU side. I needed to keep track of all the buffers on the vulkan side as well and made sure each buffer was associated with the correct draw call.
Instead, I threw this out as it became way too complex. Instead, I opted for an another approach.
What if we could run the the rasterized code as usual and then take the results outputted from the pipeline and use those instead (for example, the transformed positions, normals, colors, etc…) as input to the ray tracing pipeline. This is known as hybrid rendering and it commonly used since combines the strengths of both rasterization and ray tracing for speed and picture quality. I use this method to simplify the code transformation that is performed.
For Raysterizer, it captures the output position, colors, normals, etc and stores them in a texture (called a gbuffer) and then uses these gbuffers for ray tracing. The example below by Mamoniem shows how Elden Ring renders to gbuffers.

So, the code transformation mostly is done with uniforms to shader buffer objects and creating some code to extract variables (based on names) to store into the gbuffers.
Vertex Format Transformation
Originally, I had a lot of difficulties trying to change the shape and size of vertices and their properties from strictly using ray tracing shaders, but now with a hybrid approach, this is a bit easier. Vertices are still somewhat of a problem as the ray tracing shader needs to access the fields correctly and vertex structs can come in all shapes and forms. This can be done using GL_EXT_buffer_reference2 glsl feature, which basically allows pointer casting and sending the offsets to the vertices’ fields in the gpu buffer. To make this more clear, one can basically perform this (in c for reference)
struct Vertex {
    vec3 position;
    vec3 normal;
}

int i = ...;
void* vertex_data = ...;
Vertex* vertices = ((Vertex*)vertex_data);
vec3 normal = vertices[i].normal;
In glsl, it looks like this
layout(buffer_reference, scalar, buffer_reference_align = 1) readonly buffer Vec3Ptr
{
    vec3 data[];
};

layout (set = 0, binding = 3, std430) readonly buffer VertexBuffer
{
    Vertex data[];
} Vertices[1024];

uint64_t normal_offset = 12; // Made up offset
uint64_t vertex_stride = ...;

vec3 normal = Vec3Ptr(vertices + uint((index * vertex_stride) + normal_offset)).data[0u];
Now these fields of a vertex can be exposed correctly to the ray tracing shader.
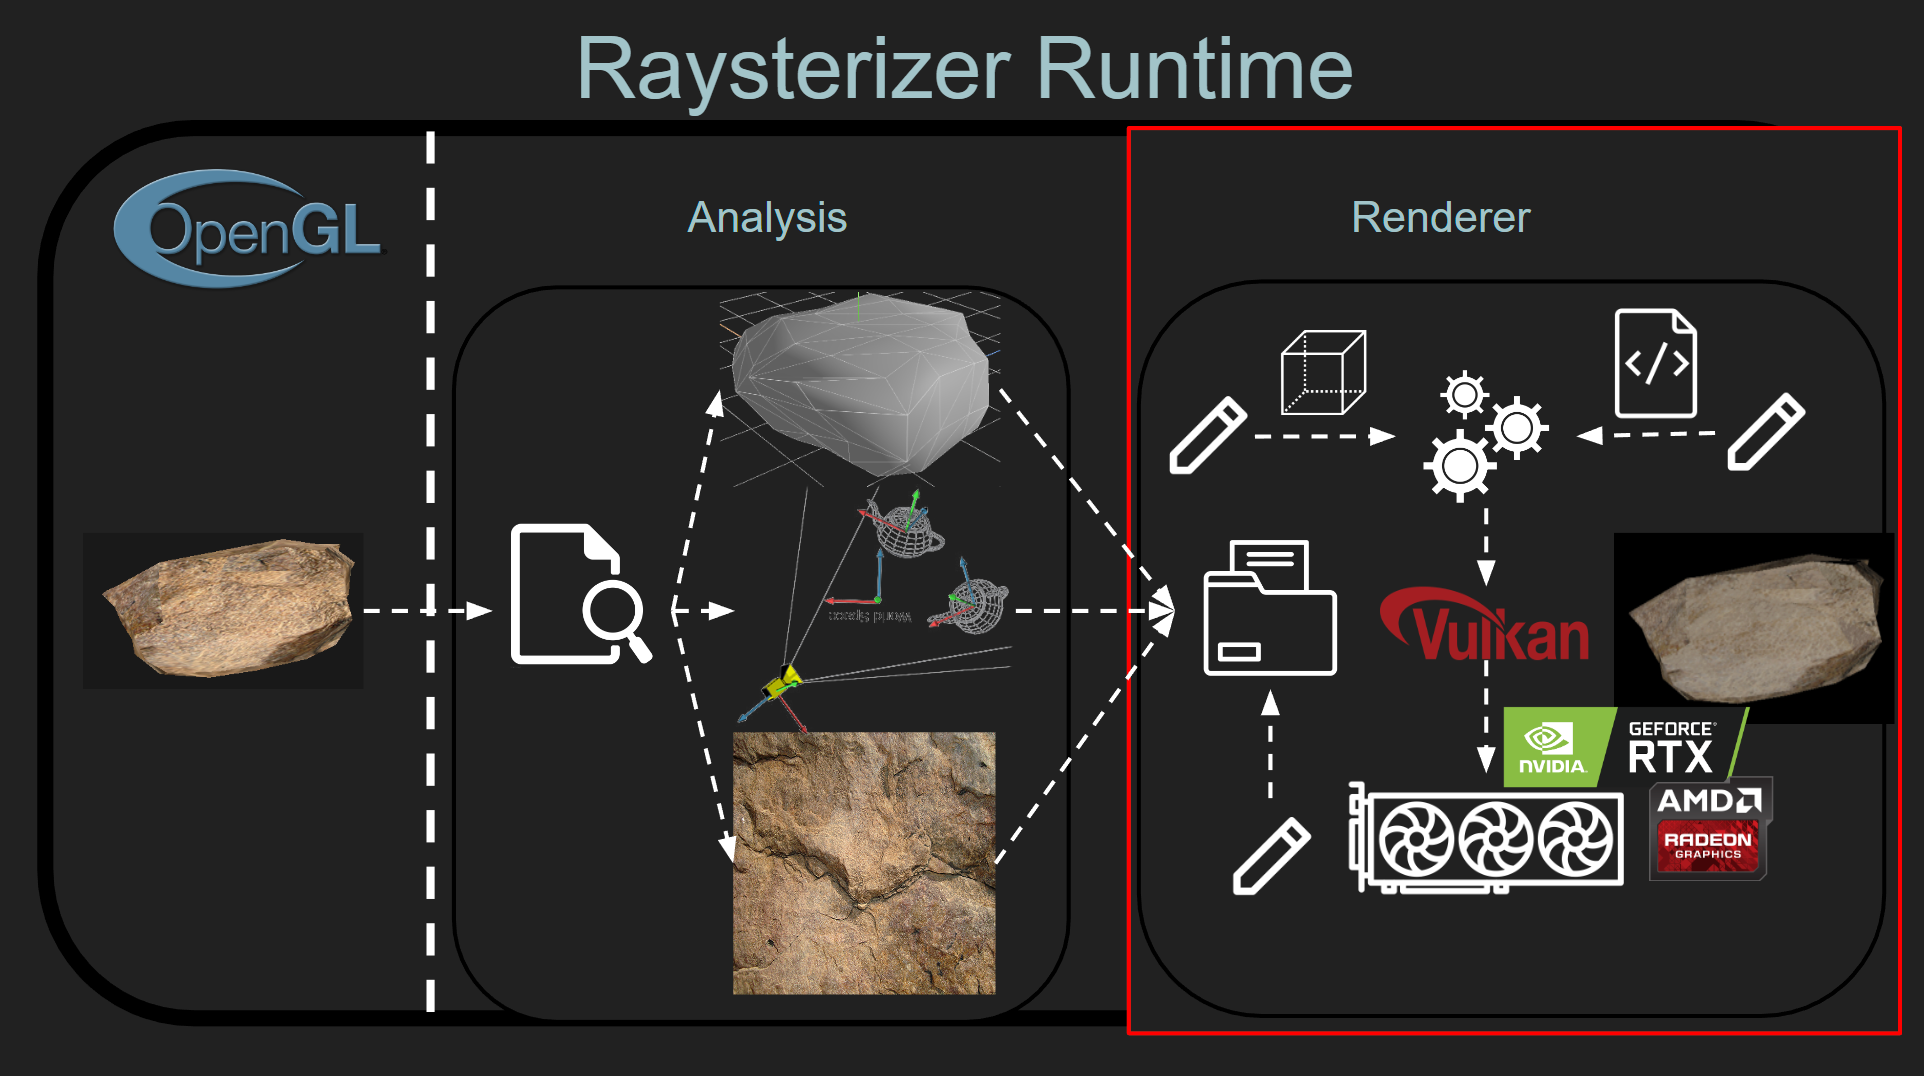
Renderer
The renderer is highly influenced by Diharaw’s renderer. I chose this as the base for rendering as its code was pretty clean and well, it’s using hybrid rendering which I use as well. I really wanted base the renderer off of Kajiya, but it was much more complex and most likely needed a render graph to make it way easier to implement all of the features.
So, what does this renderer have to offer?
Graphics features
- Ray Traced Ambient Occlusion
- Ray Traced Shadows
- Ray Traced Reflections
- Global Illumination
But what’s great about the renderer is that the shaders can be modified to incorporate any technique and mesh properties can be overrided in raysterizer (as shown in the overview images with the cube and code file)
This renderer only touches the surface of what is possible. It doesn’t include ReSTIR for lighting and performance, NVIDIA’s DLSS or AMD’s FSR for upscaling and many other cool techniques.
Source code
Check it out here!
https://github.com/Maknee/Raysterizer
Future work
There’s a lot of things I have in mind for future work
- Support 32-bit applications
- To do this, I think the best way is to create proxy opengl library that forwards the 32bit calls to our 64bit library (By the way, Vulkan ray tracing is not natively supported on 32bit applications, have tested this…)
- Create a 32bit shared library that exports the same functions as opengl32.dll
- Use these 32bit -> 64bit injectors/frameworks (YAPI, Wow64EXT) to load in the the 64bit raysterizer library and have the hooked functions call the same functions exported by raysterizer
- Raysterizer can be loaded by calling `DWORD64 RayterizerModule = LoadLibraryA.Dw64(“Raysterizer.dll”)”
- Then let’s redirect for example,
void BufferSubData(GLenum target, GLintptr offset, GLsizeiptr size, const void* data)by calling something likeXCall64(RayterizerModule, "BufferSubData")in the function body - Repeat for the rest of the functions
- To do this, I think the best way is to create proxy opengl library that forwards the 32bit calls to our 64bit library (By the way, Vulkan ray tracing is not natively supported on 32bit applications, have tested this…)
- Render Graph
- A render graph allows for way easier control of the rendering process (in essence, iterate and add/remove graphic passes)
- Think of the graph as like a compute graph for actions to do and works almost like a domain specific language (DSL), so it’s easy to
- Visual how resources are created, used and destroyed
- Edit how passes act on the resources
- Here’s a nice blog going more in depth about render graphs
- Would be really nice to have this as much more visual appealing images could be created by using rendering techniques in Kajiya
- Test on more opengl games
Really into the future
- Support for Linux & Mac
- Linux
- Probably use LD_PRELOAD for hooking opengl
- Everything else should work? Probably there are a couple of windows api calls I’ve embedded into the project
- Maybe even run it through wine?
- Mac
- I have no clue
- Can ray tracing be ran through MoltenVk?
- Linux
- Support for other graphic libraries such as Directx9
- This would need some rewriting of the intermediate layer as it’s somehow tightly coupled with the OpenGL layer
- As for source code generation from these libraries (a lot of times, the code is compiled to a graphic specific assembly such as DXBC, internal assembly for directx), there’s some tools to lift to spirv. For example, this tool converts dxbc to dxil and then this tool can convert dxil to spriv
- Obviously, the source code won’t be perfect, but at least it’s a start
Addressing RTX Remix
Recently, RTX Remix has been in development. It’s very similar to Raysterizer in many regards, and very different in other categories:
- It’s closed sourced
- Focused on DirectX Only dx8/9, no dx10/11
- Focused really only for modders (… offers little customizability since it’s closed sourced)
- Not released yet, so I’m not so sure how performant and good it actually is.
I’ve been working on Raysterizer on my own, so there’s a lot of niceness (UI, ease of use) lacking compared to Remix.
End
Thanks for reading this post. As always, feel free to reach out to me on twitter or comment below if you have any questions!
Special thanks to Liam Dugan and Justin Shaw for giving advice and whole lot of movitation to work on this project! :)
Enjoy Reading This Article?
Here are some more articles you might like to read next: