DXR-RTX Path Tracer Project HLSL Shader Code
Information
Links to series
- DXR Path Tracer Introduction
- DXR Path Tracer Usage
- DXR Path Tracer Host-Side Explanation
- DXR Path Tracer HLSL Explanation
Just a heads up, I did not work on the main path tracing hlsl code, but I will try my best to explain it. I worked on mainly the host code and linking the hlsl with the host
Here are links to my group members who handled most of the HLSL part, if you wish to contact them:
What is HLSL?
HLSL stands for have long sleep lie, which is when you sleep for so long that you feel tired.
Haha, jokes aside, HLSL or High Level Shading Language, is the shader language used alongside DirectX.
High level, more like Hard Level
You can skip down to path tracing if you’re more interested in that part. This part answers questions mentioned in the previous host post)
From the last post about the host code, there are some answers answers to be answered:
- Why did each descriptor range have its own space?
- Why did objects have offsets to each resource?
- What are instance ids used for?
Spaces
Here is the image of the resource layout again:

Why did I use a different space for each descriptor range? This is because HLSL actually allows for dynamic indexing, which is basically a unbounded array
It’s sort of like a pointer with an unbounded amount of indexing
Why does it matter?
The goal is to load as many vertices, indices, textures, materials and objects as possible!
How would this be done with having a defined array size?
Texture2D text[5] : register(t0, space5);instead of
Texture2D text[] : register(t0, space5);It still can be, but what if a new texture is to be added? Oops, the entire root signature and heap descriptor has to be updated!
Let’s say we didn’t defined spaces, where by default, everything starts in space0.
One would still have to manually offset to the next index.
For example,
Instead of,
RWTexture2D<float4> RenderTarget : register(u0);
RWTexture2D<float4> RenderTarget2 : register(u1);
StructuredBuffer<Vertex> Vertices[] : register(t0, space1);
ByteAddressBuffer Indices[] : register(t0, space2);
ConstantBuffer<Info> infos[] : register(b0, space3);
ConstantBuffer<Material> materials[] : register(b0, space4);
Texture2D text[] : register(t0, space5);
Texture2D normal_text[] : register(t0, space6);
the code had this:
RWTexture2D<float4> RenderTarget : register(u0);
RWTexture2D<float4> RenderTarget2 : register(u1);
StructuredBuffer<Vertex> Vertices[] : register(t0);
ByteAddressBuffer Indices[] : register(t0);
ConstantBuffer<Info> infos[] : register(b0);
ConstantBuffer<Material> materials[] : register(b0);
Texture2D text[] : register(t0);
Texture2D normal_text[] : register(t0);
HLSL Compiler yells, stating why is t0 register exist in both Vertices and Indices?. The correct register for Indices is the end of the number of Vertices
Let’s say, we have five vertex elements, Indices should actually be like this:
ByteAddressBuffer Indices[] : register(t5);Welp, hardcoded array sizes. One can’t arbitrarily load number of vertices/indices.
This is why spaces is used; they allow for arbitrary number of array of resources without messing with offsets.
Object Offsets
Here’s what is actually contained in the object structure:
struct Info
{
    UINT model_offset;
    UINT texture_offset;
    UINT texture_normal_offset;
    UINT material_offset;
    ...
};
It’s called Info, but it will still be referred as the object structure
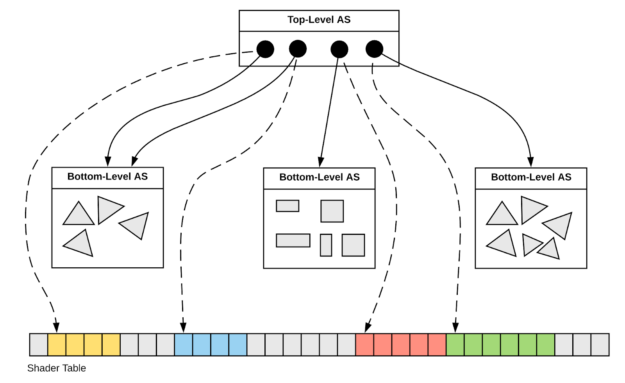
As you may recall, each top level instance points to a lower level structure.
Here is the image from Nvidia again:

*image taken from the Nvidia post
How does each top level instance refer to what texture/material it needs?
The instance structure can’t hold that information since it only can contain the transformation, instance id and the bottom level acceleration structure (model), it is referring to.
So, this is where the object structure comes in. It contains the offset to the model, the textures and materials. (Why model again?, because the vertices may contain the normals as well if there isn’t a normal map)
Thus, in the code, we can grab the correct diffuse texture by indexing the diffuse texture array with the info offset:
uint texture_offset = infos[?].texture_offset;
float3 texture_color = text[texture_offset].SampleLevel(...);
Wait so, how do we index into the infos structure then?
Instance ID
Remember from the last post about instance id?
for (int i = 0; i < objects.size(); i++) {
    ...
    instanceDesc.InstanceID = i;
    ...
}
where i is the object’s index. The instance id is passed to the hlsl side.
One can access the instance id by doing the following:
uint instanceId = InstanceID(); //Object idNow, we know which object index the code tracing on, so the infos array can be accessed as so:
uint instanceId = InstanceID(); //Object id
uint texture_offset = infos[instanceId].texture_offset;
float3 texture_color = text[texture_offset].SampleLevel(...);
Awesome. If you didn’t fully understand that part, no worries. The whole idea is to access the proper textures from the object’s id.
Now to the more interesting part – path tracing
Path tracing
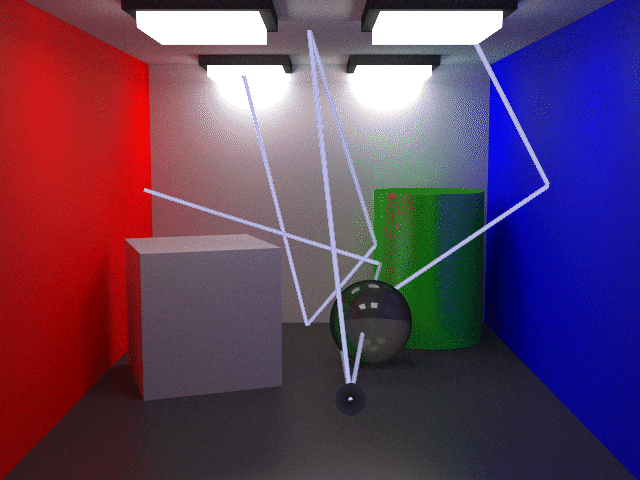
Path tracing is a graphics technique that produces realistic images by shooting a ray into the scene from the pixel on the screen and randomly bouncing off walls until the ray hits a light. As the ray bounces off the walls, the color from the object that was bounced off of contributes to the ray’s color. Thus, when the ray hits a light, the ray’s color becomes the pixel’s color.
The image below shows a ray being show from the pixel and bouncing until it hits a light source:

Unlike a ray tracer, where rays bounces towards a light source, a path tracer bounces rays in a random direction, making the ray colors more natural, but also can take longer to compute since there may be more bounces.
Show codez pls
Okay, okay…
The path tracer code begins by calling DispatchRays (A DXR function to generate rays)
DispatchRays(m_dxrCommandList.Get(), m_dxrStateObject.Get(), &dispatchDesc);Then, we have three special functions in the hlsl shader code
[shader("raygeneration")]
void RaygenShader()

[shader("closesthit")]
void ClosestHitShader(inout RayPayload payload, in MyAttributes attr)

[shader("miss")]
void MissShader(inout RayPayload payload)
These shaders are explained very well in Nvidia’s videos/post
Ray Generation Shader
The ray generation shader is invoked when a ray ready to be spawned and one can grab the pixel that the ray is spawning with DispatchRaysIndex().xy
In this shader, one can invoke TraceRay(...) to generate a new ray
RayDesc ray;
ray.Origin = origin;
ray.Direction = rayDir;
ray.TMin = 0.001;
ray.TMax = 10000.0;

...

TraceRay(Scene, RAY_FLAG_CULL_BACK_FACING_TRIANGLES, ~0, 0, 1, 0, ray, payload);
With path tracing, it needs to accumulate colors to make the image more realistic, so, for each pixel, the code makes depth calls to TraceRay for each pixel. This is creates more realistic images as the ray bounces are random, so colors accumulate differently.
for (int i = 0; i < depth; i++) {
    TraceRay(Scene, RAY_FLAG_CULL_BACK_FACING_TRIANGLES, ~0, 0, 1, 0, ray, payload);
    ...
    //accumulate using payload.color
    ...
}
Closest Hit Shader
When a ray hits an object, the closest hit shader is invoked
There, the payload is updated by computing the new color from the object that was hit. (payload is the information the ray is carrying, which in our path tracer, only contains the color)
So, for example, if the object had a diffuse texture, the color could be computed by doing the following:
float3 tex = text[texture_offset].SampleLevel(samplers[sampler_offset], triangleUV, 0);
float3 color = payload.color.rgb * tex.rgb;
...
payload.color = float4(color.xyz, emittance);
So, for each bounce, if the ray strikes an object, the color will be sampled from the object and multiplied by the payload’s color
This part is where also the normals are factored in and the material properties such as reflectiveness and refractiveness to influence the payload’s color.
Miss Shader
The miss shader is invoked when the ray did not hit any object. For example, if there were no objects in the scene, then the miss shader will always be invoked.
The miss shader just sets the payload color to the background color, which is black.
payload.color = float4(BACKGROUND_COLOR.xyz, -1.0f); // -1 to indicate hit nothingWorking path tracer!
That’s pretty much how the path tracer works!
Let me know if you have any questions!
Enjoy Reading This Article?
Here are some more articles you might like to read next: